SlideShare a Scribd company logo
1 of 28
Download to read offline
G'MIC Water color filter
       tutorial on using the filter and
how similar effect can be created using Gimp


                               G'MIC filter programming: Tom Keil
                               Tutorial: Arto Huotari
Section 1: G'MIC Water color filter
   G'MIC water color filter creates channels of Cyan, Magenta and
   Yellow and mixes them to each other for different colors. Water
   color like effect is created by preliminary preparation of the image
   and textured masks created with Cubism and Fuzzy frame filters.
   For deeper understanding it is recommended to read through the
   second section of the tutorial.

   Whole range of the effect is presented in video
   “Travel in water color” by Zonder.
G'Mic Water color filter, learning the filter

Since the filter has a lot of settings it may be that for your image the filter does not produce
desired results with the default settings. This tutorial aims to help new user to produce some
result and hopefully lead to quicker learning of the filter.

Start by setting all sliders to left except Cyan Stroke Strength, Magenta Stroke Strength and
Yellow Stroke Strength. Set these sliders to the right. Preview should now look black. Next
slide color intensity slider to the right to get colors to the preview window
G'Mic Water color filter, learning the filter

Next go to the Color brushes settings section and slide the edge distance sliders. Start with
the strongest color and proceed to weaker colors next. Move the sliders so that you have
three stacked boxes of different size.
G'Mic Water color filter, learning the filter

Next set the abstraction setting to your liking. Again start with the strongest color
G'Mic Water color filter, learning the filter

Next increase the brush size to merge the grains of individual colors
G'Mic Water color filter, learning the filter

 To complete the color settings move the stroke strength sliders to left in order to smooth out
and weaken the colors.
G'Mic Water color filter, learning the filter

Set paper color, texture and invert colors settings. Then revert back to the top of the dialogue
and adjust Light colors slider at least to 0.01. Note that the effect of the slider may not be
linear. Note the difference between 0.05 and 0.06. This is caused by high color intensity and
zero dark colors setting. Adjust color intensity settings and click OK to process the image
G'Mic Water color filter, learning the filter

Final image processed with the previous values
Section 2: Creating the effect in Gimp.

Base image used in this tutorial is 1164x947 pixels. For larger images effect
produces different results and different values for parameters should be used.
Step 1: Reduce the detail of the image using selective Gaussian blur
Duplicate background layer, select Filters → Blur → Selective Gaussian blur
Slice of unmodified image is shown on the right. Blur was done using with radius
10 and delta 30
Step 2-1: Enhancing and bringing out the remaining detail. Duplicate the layer.
Filters → Edge detect → Edge → Sobel (with value 3 in this case)
Edit → Fade Edge→ Dodge (middle slice)
Set layer mode to Value (right slice)
Step 2-2: Enhancing and bringing out the remaining detail. Duplicate the layer,
   Set layer mode to burn
   Filters → Blur → Gaussian blur (value 5)
   Filters → Edge Detect → Edge → Sobel (3)
   Edit → Fade Edge → Divide
   Right click to layer → Add layer mask → Gray scale copy → Invert colors → Add

Previous          Burn                 Blur          Sobel            Masked


                                                      Divide
Step 2-3: Enhancing and bringing out the remaining detail. Duplicate the third
layer in the stack. Move it to top, set layer mode to Devide
Filters → Blur → Gaussian blur (value 10)
Filters → Edge Detect → Edge → Sobel (6)
Edit → Fade Edge → Divide
Right click to layer → Add layer mask → Gray scale copy → Invert colors → Add

                        From
                        step 2-2                Step 2-3 final
Step 2-3: Explained
Both blur value and edge detection intensity were increased from previous step. If
we look in to the images with out masks a difference can be seen.

Image on the left has smaller blur value and edge detection intensity. There are
more detail edges present and the edges are thinner.
Step 2-3: Explained
On step 2-3 layer mode divide was used instead of burn. By zooming in to the
image and changing layer modes the difference can be seen.
Different layer modes give different results. Idea here is not to use only burn
since using burn only creates very dark and strong edges. Our target is to create
water color like image we want to enhance the edges with out making them too
dark and sharp

            Before                          Divide


                                                                Dodge
                                            Burn
                Value
Step 2-4: Continue duplicating the third layer on the stack and use increasing blur
 and Edge Detect values until the layer bitmap is white after divide. Disregard the
 white layer. With the example image, blur value 40 loses all detail.


There are multiple ways to vary the layer stack. Layer mode of each layer affects the end
result, also different result is produced if the visible result (edit copy visible) of previous
step is used instead of third layer in the stack for each new enhancement layer (paste as
new layer). Now is a good time to save the image and also save it to different name and
continue with new copy.
Step 3-1: Spread strong colors
Blank the background layer. Select one of the visible layers, right click and select
“merge visible layers.”
Step 3-1: Spread strong colors
Duplicate the layer
Break the image to LAB channels.
Colors → Components → Decompose → LAB
Blank A and B layers and select L layer.
From tool box select tool “select by color”
Zoom in to the image and select as dark pixel you can find and set the selection
threshold to your liking. For sample image the L channel was very light so I used
threshold of 30. Idea here is to simulate the spread of strong water color because
of absorption to paper.
Step 3-2: Spread strong colors
                                               1. Blur the selection → Filters →
                                               Blur → Gaussian Blur (5)
          Original


        2. Select the border Select           3. Filters → noise → Spread (3/5)
        → Border (3)


                                      4. Select → feather(3)
                                      5. Filters → Blur → Gaussian (2)
Step 3-3: Spread strong colors, recompose the image.
 Select → None
 Unblank the A and B layer
 Colors → Components → Recompose. Note that this will compose the image to
 the layer it was originally decomposed from. It is recommended to rename the
 layer now to “From LAB”


Original


Modified
Step 4-1: Move to CMY color space / preparation
Duplicate the “From LAB” layer
Invert colors of the “From LAB” layer
Add new layer with a black color
Add new layer with a white color
Blank the black and white layer
Activate the “Inverted From LAB” layer.
Step 4-2: Move to CMY color space ... / create color layers
Switch to the channels tab and blank Green and Blue channels
Edit → Copy Visible
Edit → Paste as new layer
Move the layer on top of black layer
Rename the layer as Cyan
Blank the layer
Select “Inverted From LAB” layer
Step 4-3: Move to CMY color space / create color layers
Repeat previous steps for green and blue channel

Switch to channels tab and blank Red and Blue channels
Edit → Copy Visible
Edit → Paste as new layer
Move the layer on top of black layer
Rename the layer as Magenta
Blank the layer
Select “Inverted From LAB” layer

Switch to the channels tab and blank Red and Green channels
Edit → Copy Visible
Edit → Paste as new layer
Move the layer on top of black layer
Rename the layer as Yellow
Blank the layer

Switch to channels tab and turn on all channels
Switch back to layers tab and add black mask to Cyan,
 Magenta and Yellow layers

Final layer stack is shown on the right
Step 4-4: Move to CMY color space / set layer modes
Unblank the layers and set layer modes as shown
Your image should be completely white now


                           Difference

                               Addition

                                  Addition

                                Addition

                         Normal
Step 5-1: Create line art
Use your favorite method of creating the line art and place it on top of layer
stack. Use the original image to create the line art.

This was created by
Filters → Blur → Selective Gaussian Blur 3 with delta 15
Filters → G'Mic → Artistic → B&W Pencil with default values
Colors → Levels to lighten the sketch if necessary
Set layer mode to Multiply
Step 6-1: Use water color brushes to paint out the colors. Use white color to paint
on the black masks of the Cyan, Magenta and Yellow layers.
Final image and final layer stack shown.
Note that also red, green and blue can be added to color layers as has been
done here to bring to make the water look blue instead of brown.
End of tutorial

                             Thank you

And also thank you for following persons and services for water color
        brushes that were used to create image on second
                        Section of the tutorial.

           http://www.brusheezy.com/members/jermshaw
              http://www.brusheezy.com/members/Aqs
                  http://mcbadshoes.deviantart.com/
                   http://www.env1ro.deviantart.com

More Related Content

What's hot

Retouching tutorial
Retouching tutorialRetouching tutorial
Retouching tutorialrahmadnadzri
 
Image Manipulation Editing With Photoshop
Image Manipulation Editing With PhotoshopImage Manipulation Editing With Photoshop
Image Manipulation Editing With Photoshoppostk
 
Bruce Block's Visual Components For Filmmakers
Bruce Block's Visual Components For FilmmakersBruce Block's Visual Components For Filmmakers
Bruce Block's Visual Components For Filmmakersthomasjcastillo
 
Adobe Connect 9.3 Whats New
Adobe Connect 9.3 Whats NewAdobe Connect 9.3 Whats New
Adobe Connect 9.3 Whats NewTom Behan
 
P 18 Underwaterw With Rays
P 18 Underwaterw With RaysP 18 Underwaterw With Rays
P 18 Underwaterw With Rayssumidahilo
 
Night Vision
Night VisionNight Vision
Night Visionshalace09
 
Photo Manipulation Tutorial (Step by Step Process)
Photo Manipulation Tutorial (Step by Step Process)Photo Manipulation Tutorial (Step by Step Process)
Photo Manipulation Tutorial (Step by Step Process)Overnight Graphics
 
COLOR SIGNAL TRANSMISSION AND RECEPTION
COLOR SIGNAL TRANSMISSION AND RECEPTIONCOLOR SIGNAL TRANSMISSION AND RECEPTION
COLOR SIGNAL TRANSMISSION AND RECEPTIONShwetaRevankar4
 
Adobe photooshop
Adobe photooshopAdobe photooshop
Adobe photooshopalice eve
 
2 working with layers and adjusting the image quality
2 working with layers and adjusting the image quality2 working with layers and adjusting the image quality
2 working with layers and adjusting the image qualityMarty Sison
 
Thermal photo effect
Thermal photo effectThermal photo effect
Thermal photo effectbaljaadsg
 
2d right
2d right2d right
2d rightenj106
 
Manual Segmentation-3747
Manual Segmentation-3747Manual Segmentation-3747
Manual Segmentation-3747Kitware Kitware
 
How to Create Realistic Eyeballs in Photoshop
How to Create Realistic Eyeballs in PhotoshopHow to Create Realistic Eyeballs in Photoshop
How to Create Realistic Eyeballs in PhotoshopMetrodesk
 
How to make a photoshop advert a4 poster
How to make a photoshop advert a4 posterHow to make a photoshop advert a4 poster
How to make a photoshop advert a4 postersparkly
 
Colored pencil effect
Colored pencil effectColored pencil effect
Colored pencil effectNatalie Hurd
 

What's hot (19)

Retouching tutorial
Retouching tutorialRetouching tutorial
Retouching tutorial
 
Image Manipulation Editing With Photoshop
Image Manipulation Editing With PhotoshopImage Manipulation Editing With Photoshop
Image Manipulation Editing With Photoshop
 
Space
SpaceSpace
Space
 
Bruce Block's Visual Components For Filmmakers
Bruce Block's Visual Components For FilmmakersBruce Block's Visual Components For Filmmakers
Bruce Block's Visual Components For Filmmakers
 
Adobe Connect 9.3 Whats New
Adobe Connect 9.3 Whats NewAdobe Connect 9.3 Whats New
Adobe Connect 9.3 Whats New
 
P 18 Underwaterw With Rays
P 18 Underwaterw With RaysP 18 Underwaterw With Rays
P 18 Underwaterw With Rays
 
Night Vision
Night VisionNight Vision
Night Vision
 
Photo Manipulation Tutorial (Step by Step Process)
Photo Manipulation Tutorial (Step by Step Process)Photo Manipulation Tutorial (Step by Step Process)
Photo Manipulation Tutorial (Step by Step Process)
 
COLOR SIGNAL TRANSMISSION AND RECEPTION
COLOR SIGNAL TRANSMISSION AND RECEPTIONCOLOR SIGNAL TRANSMISSION AND RECEPTION
COLOR SIGNAL TRANSMISSION AND RECEPTION
 
Adobe photooshop
Adobe photooshopAdobe photooshop
Adobe photooshop
 
2 working with layers and adjusting the image quality
2 working with layers and adjusting the image quality2 working with layers and adjusting the image quality
2 working with layers and adjusting the image quality
 
Thermal photo effect
Thermal photo effectThermal photo effect
Thermal photo effect
 
2d right
2d right2d right
2d right
 
Tonal Range
 Tonal Range Tonal Range
Tonal Range
 
Manual Segmentation-3747
Manual Segmentation-3747Manual Segmentation-3747
Manual Segmentation-3747
 
How to Create Realistic Eyeballs in Photoshop
How to Create Realistic Eyeballs in PhotoshopHow to Create Realistic Eyeballs in Photoshop
How to Create Realistic Eyeballs in Photoshop
 
How to make a photoshop advert a4 poster
How to make a photoshop advert a4 posterHow to make a photoshop advert a4 poster
How to make a photoshop advert a4 poster
 
Joanne's photos
Joanne's photosJoanne's photos
Joanne's photos
 
Colored pencil effect
Colored pencil effectColored pencil effect
Colored pencil effect
 

Viewers also liked

Generate navigation mesh
Generate navigation meshGenerate navigation mesh
Generate navigation meshChao-Chih Lin
 
Sea power session 2-dutch golden age
Sea power session 2-dutch golden ageSea power session 2-dutch golden age
Sea power session 2-dutch golden ageJim Powers
 
Colorizing image with Gimp
Colorizing image with Gimp Colorizing image with Gimp
Colorizing image with Gimp Arto Huotari
 
PLANIN1 Oradour Sur-Glane & Copehill Down
PLANIN1 Oradour Sur-Glane & Copehill DownPLANIN1 Oradour Sur-Glane & Copehill Down
PLANIN1 Oradour Sur-Glane & Copehill DownCarla Faner
 
Intro to 12-Year Reich
Intro to 12-Year ReichIntro to 12-Year Reich
Intro to 12-Year ReichJim Powers
 
Early Italian Renaissance
Early Italian RenaissanceEarly Italian Renaissance
Early Italian RenaissanceCarla Faner
 

Viewers also liked (6)

Generate navigation mesh
Generate navigation meshGenerate navigation mesh
Generate navigation mesh
 
Sea power session 2-dutch golden age
Sea power session 2-dutch golden ageSea power session 2-dutch golden age
Sea power session 2-dutch golden age
 
Colorizing image with Gimp
Colorizing image with Gimp Colorizing image with Gimp
Colorizing image with Gimp
 
PLANIN1 Oradour Sur-Glane & Copehill Down
PLANIN1 Oradour Sur-Glane & Copehill DownPLANIN1 Oradour Sur-Glane & Copehill Down
PLANIN1 Oradour Sur-Glane & Copehill Down
 
Intro to 12-Year Reich
Intro to 12-Year ReichIntro to 12-Year Reich
Intro to 12-Year Reich
 
Early Italian Renaissance
Early Italian RenaissanceEarly Italian Renaissance
Early Italian Renaissance
 

Similar to G'MIG water color filter tutorial

Watercolor Painting Effect
Watercolor Painting EffectWatercolor Painting Effect
Watercolor Painting Effectshalace09
 
Photohsop movie 06
Photohsop movie 06Photohsop movie 06
Photohsop movie 06Ngoc Dep
 
The 8 Basic Steps Elements 6
The 8 Basic Steps  Elements 6The 8 Basic Steps  Elements 6
The 8 Basic Steps Elements 6joelk
 
The 8 Basic Steps Elements 6
The 8 Basic Steps  Elements 6The 8 Basic Steps  Elements 6
The 8 Basic Steps Elements 6joelk
 
Fajardo, winfreya m. 11 caritas, abm
Fajardo, winfreya m. 11  caritas, abmFajardo, winfreya m. 11  caritas, abm
Fajardo, winfreya m. 11 caritas, abmshanneprincesspanamb
 
Applying color effect in photoshop
Applying color effect in photoshopApplying color effect in photoshop
Applying color effect in photoshopsujon hasan
 
Double Exposure Skills Development
Double Exposure Skills DevelopmentDouble Exposure Skills Development
Double Exposure Skills DevelopmentHayleyMcCarthy
 
Photoshop Tutorial Displacement Maps
Photoshop Tutorial  Displacement MapsPhotoshop Tutorial  Displacement Maps
Photoshop Tutorial Displacement Mapstvawler
 
Photo shop cs5-watercolor-painting-effect-tutorial
Photo shop cs5-watercolor-painting-effect-tutorialPhoto shop cs5-watercolor-painting-effect-tutorial
Photo shop cs5-watercolor-painting-effect-tutorialMenSagam Technologies
 
Non Destructive Color Correction
Non Destructive Color CorrectionNon Destructive Color Correction
Non Destructive Color CorrectionAnn Elliott
 
Abstract Halloween Tutorial
Abstract Halloween TutorialAbstract Halloween Tutorial
Abstract Halloween Tutorialstephonsimeon
 
Woodfence texture tutorial
Woodfence texture tutorialWoodfence texture tutorial
Woodfence texture tutorialrborajr
 
Photoshop_BlendingPhotos
Photoshop_BlendingPhotosPhotoshop_BlendingPhotos
Photoshop_BlendingPhotostutorialsruby
 
Photoshop_BlendingPhotos
Photoshop_BlendingPhotosPhotoshop_BlendingPhotos
Photoshop_BlendingPhotostutorialsruby
 
Photoshop Blending Modes_ Beginner’s Tips and Tricks
Photoshop Blending Modes_ Beginner’s Tips and TricksPhotoshop Blending Modes_ Beginner’s Tips and Tricks
Photoshop Blending Modes_ Beginner’s Tips and TricksZenith Clipping
 

Similar to G'MIG water color filter tutorial (20)

Ps zen mj
Ps zen mjPs zen mj
Ps zen mj
 
Lemon mix up
Lemon mix upLemon mix up
Lemon mix up
 
Lemon mix up
Lemon mix upLemon mix up
Lemon mix up
 
Watercolor Painting Effect
Watercolor Painting EffectWatercolor Painting Effect
Watercolor Painting Effect
 
Photohsop movie 06
Photohsop movie 06Photohsop movie 06
Photohsop movie 06
 
Writing de materials1
Writing de materials1Writing de materials1
Writing de materials1
 
The 8 Basic Steps Elements 6
The 8 Basic Steps  Elements 6The 8 Basic Steps  Elements 6
The 8 Basic Steps Elements 6
 
The 8 Basic Steps Elements 6
The 8 Basic Steps  Elements 6The 8 Basic Steps  Elements 6
The 8 Basic Steps Elements 6
 
Fajardo, winfreya m. 11 caritas, abm
Fajardo, winfreya m. 11  caritas, abmFajardo, winfreya m. 11  caritas, abm
Fajardo, winfreya m. 11 caritas, abm
 
Applying color effect in photoshop
Applying color effect in photoshopApplying color effect in photoshop
Applying color effect in photoshop
 
Neon glow
Neon glowNeon glow
Neon glow
 
Double Exposure Skills Development
Double Exposure Skills DevelopmentDouble Exposure Skills Development
Double Exposure Skills Development
 
Photoshop Tutorial Displacement Maps
Photoshop Tutorial  Displacement MapsPhotoshop Tutorial  Displacement Maps
Photoshop Tutorial Displacement Maps
 
Photo shop cs5-watercolor-painting-effect-tutorial
Photo shop cs5-watercolor-painting-effect-tutorialPhoto shop cs5-watercolor-painting-effect-tutorial
Photo shop cs5-watercolor-painting-effect-tutorial
 
Non Destructive Color Correction
Non Destructive Color CorrectionNon Destructive Color Correction
Non Destructive Color Correction
 
Abstract Halloween Tutorial
Abstract Halloween TutorialAbstract Halloween Tutorial
Abstract Halloween Tutorial
 
Woodfence texture tutorial
Woodfence texture tutorialWoodfence texture tutorial
Woodfence texture tutorial
 
Photoshop_BlendingPhotos
Photoshop_BlendingPhotosPhotoshop_BlendingPhotos
Photoshop_BlendingPhotos
 
Photoshop_BlendingPhotos
Photoshop_BlendingPhotosPhotoshop_BlendingPhotos
Photoshop_BlendingPhotos
 
Photoshop Blending Modes_ Beginner’s Tips and Tricks
Photoshop Blending Modes_ Beginner’s Tips and TricksPhotoshop Blending Modes_ Beginner’s Tips and Tricks
Photoshop Blending Modes_ Beginner’s Tips and Tricks
 

Recently uploaded

Indian High Profile Call Girls In Sector 18 Noida 8375860717 Escorts Service
Indian High Profile Call Girls In Sector 18 Noida 8375860717 Escorts ServiceIndian High Profile Call Girls In Sector 18 Noida 8375860717 Escorts Service
Indian High Profile Call Girls In Sector 18 Noida 8375860717 Escorts Servicedoor45step
 
Jvc Call Girl +971528604116 Indian Call Girl in Jvc By Dubai Call Girl
Jvc Call Girl +971528604116 Indian Call Girl in Jvc By Dubai Call GirlJvc Call Girl +971528604116 Indian Call Girl in Jvc By Dubai Call Girl
Jvc Call Girl +971528604116 Indian Call Girl in Jvc By Dubai Call Girllijeho2176
 
Zoo_championship_Wrestling (action/comedy sample)
Zoo_championship_Wrestling (action/comedy sample)Zoo_championship_Wrestling (action/comedy sample)
Zoo_championship_Wrestling (action/comedy sample)DavonBrooks
 
Benjamin Portfolio Process Work Slideshow
Benjamin Portfolio Process Work SlideshowBenjamin Portfolio Process Work Slideshow
Benjamin Portfolio Process Work Slideshowssuser971f6c
 
Escort Service in Al Rigga +971509530047 UAE
Escort Service in Al Rigga +971509530047 UAEEscort Service in Al Rigga +971509530047 UAE
Escort Service in Al Rigga +971509530047 UAEvecevep119
 
How to order fake Lakeland University diploma?
How to order fake Lakeland University diploma?How to order fake Lakeland University diploma?
How to order fake Lakeland University diploma?melodolykelton
 
Call Girls In Hauz Khas 8375860717 Escorts Service Free Home Delivery
Call Girls In Hauz Khas 8375860717 Escorts Service Free Home DeliveryCall Girls In Hauz Khas 8375860717 Escorts Service Free Home Delivery
Call Girls In Hauz Khas 8375860717 Escorts Service Free Home Deliverydoor45step
 
Russian⚡ Call Girls In Sector 39 Noida✨8375860717⚡Escorts Service
Russian⚡ Call Girls In Sector 39 Noida✨8375860717⚡Escorts ServiceRussian⚡ Call Girls In Sector 39 Noida✨8375860717⚡Escorts Service
Russian⚡ Call Girls In Sector 39 Noida✨8375860717⚡Escorts Servicedoor45step
 
Jlt Call Girl +971509430017 Indian Call Girl in Jlt By Dubai Call Girl
Jlt Call Girl +971509430017 Indian Call Girl in Jlt By Dubai Call GirlJlt Call Girl +971509430017 Indian Call Girl in Jlt By Dubai Call Girl
Jlt Call Girl +971509430017 Indian Call Girl in Jlt By Dubai Call Girllijeho2176
 
Escort Service in Al Qusais +971509530047 UAE
Escort Service in Al Qusais +971509530047 UAEEscort Service in Al Qusais +971509530047 UAE
Escort Service in Al Qusais +971509530047 UAEvecevep119
 
The Hooper Talk (drama/comedy board sample)
The Hooper Talk (drama/comedy board sample)The Hooper Talk (drama/comedy board sample)
The Hooper Talk (drama/comedy board sample)DavonBrooks
 
UNIT 5-6 anh văn chuyên nganhhhhhhh.docx
UNIT 5-6 anh văn chuyên nganhhhhhhh.docxUNIT 5-6 anh văn chuyên nganhhhhhhh.docx
UNIT 5-6 anh văn chuyên nganhhhhhhh.docxssuser519b4b
 
Aiims Call Girls : ☎ 8527673949, Low rate Call Girls
Aiims Call Girls : ☎ 8527673949, Low rate Call GirlsAiims Call Girls : ☎ 8527673949, Low rate Call Girls
Aiims Call Girls : ☎ 8527673949, Low rate Call Girlsashishs7044
 
Retail Store Scavanger Hunt - Foundation College Park
Retail Store Scavanger Hunt - Foundation College ParkRetail Store Scavanger Hunt - Foundation College Park
Retail Store Scavanger Hunt - Foundation College Parkjosebenzaquen
 
Kashmiri Gate Call Girls : ☎ 8527673949, Low rate Call Girls
Kashmiri Gate Call Girls : ☎ 8527673949, Low rate Call GirlsKashmiri Gate Call Girls : ☎ 8527673949, Low rate Call Girls
Kashmiri Gate Call Girls : ☎ 8527673949, Low rate Call Girlsashishs7044
 
Abu Dhabi Housewife Call Girls +971509530047 Abu Dhabi Call Girls
Abu Dhabi Housewife Call Girls +971509530047 Abu Dhabi Call GirlsAbu Dhabi Housewife Call Girls +971509530047 Abu Dhabi Call Girls
Abu Dhabi Housewife Call Girls +971509530047 Abu Dhabi Call Girlshayawit234
 
Escort Service in Abu Dhabi +971509530047 UAE
Escort Service in Abu Dhabi +971509530047 UAEEscort Service in Abu Dhabi +971509530047 UAE
Escort Service in Abu Dhabi +971509530047 UAEvecevep119
 
Govindpuri Call Girls : ☎ 8527673949, Low rate Call Girls
Govindpuri Call Girls : ☎ 8527673949, Low rate Call GirlsGovindpuri Call Girls : ☎ 8527673949, Low rate Call Girls
Govindpuri Call Girls : ☎ 8527673949, Low rate Call Girlsashishs7044
 
Kristy Soto's Industrial design Portfolio
Kristy Soto's Industrial design PortfolioKristy Soto's Industrial design Portfolio
Kristy Soto's Industrial design PortfolioKristySoto
 

Recently uploaded (20)

Indian High Profile Call Girls In Sector 18 Noida 8375860717 Escorts Service
Indian High Profile Call Girls In Sector 18 Noida 8375860717 Escorts ServiceIndian High Profile Call Girls In Sector 18 Noida 8375860717 Escorts Service
Indian High Profile Call Girls In Sector 18 Noida 8375860717 Escorts Service
 
Jvc Call Girl +971528604116 Indian Call Girl in Jvc By Dubai Call Girl
Jvc Call Girl +971528604116 Indian Call Girl in Jvc By Dubai Call GirlJvc Call Girl +971528604116 Indian Call Girl in Jvc By Dubai Call Girl
Jvc Call Girl +971528604116 Indian Call Girl in Jvc By Dubai Call Girl
 
Zoo_championship_Wrestling (action/comedy sample)
Zoo_championship_Wrestling (action/comedy sample)Zoo_championship_Wrestling (action/comedy sample)
Zoo_championship_Wrestling (action/comedy sample)
 
Benjamin Portfolio Process Work Slideshow
Benjamin Portfolio Process Work SlideshowBenjamin Portfolio Process Work Slideshow
Benjamin Portfolio Process Work Slideshow
 
Escort Service in Al Rigga +971509530047 UAE
Escort Service in Al Rigga +971509530047 UAEEscort Service in Al Rigga +971509530047 UAE
Escort Service in Al Rigga +971509530047 UAE
 
How to order fake Lakeland University diploma?
How to order fake Lakeland University diploma?How to order fake Lakeland University diploma?
How to order fake Lakeland University diploma?
 
Call Girls In Hauz Khas 8375860717 Escorts Service Free Home Delivery
Call Girls In Hauz Khas 8375860717 Escorts Service Free Home DeliveryCall Girls In Hauz Khas 8375860717 Escorts Service Free Home Delivery
Call Girls In Hauz Khas 8375860717 Escorts Service Free Home Delivery
 
Russian⚡ Call Girls In Sector 39 Noida✨8375860717⚡Escorts Service
Russian⚡ Call Girls In Sector 39 Noida✨8375860717⚡Escorts ServiceRussian⚡ Call Girls In Sector 39 Noida✨8375860717⚡Escorts Service
Russian⚡ Call Girls In Sector 39 Noida✨8375860717⚡Escorts Service
 
Jlt Call Girl +971509430017 Indian Call Girl in Jlt By Dubai Call Girl
Jlt Call Girl +971509430017 Indian Call Girl in Jlt By Dubai Call GirlJlt Call Girl +971509430017 Indian Call Girl in Jlt By Dubai Call Girl
Jlt Call Girl +971509430017 Indian Call Girl in Jlt By Dubai Call Girl
 
Escort Service in Al Qusais +971509530047 UAE
Escort Service in Al Qusais +971509530047 UAEEscort Service in Al Qusais +971509530047 UAE
Escort Service in Al Qusais +971509530047 UAE
 
The Hooper Talk (drama/comedy board sample)
The Hooper Talk (drama/comedy board sample)The Hooper Talk (drama/comedy board sample)
The Hooper Talk (drama/comedy board sample)
 
UNIT 5-6 anh văn chuyên nganhhhhhhh.docx
UNIT 5-6 anh văn chuyên nganhhhhhhh.docxUNIT 5-6 anh văn chuyên nganhhhhhhh.docx
UNIT 5-6 anh văn chuyên nganhhhhhhh.docx
 
Aiims Call Girls : ☎ 8527673949, Low rate Call Girls
Aiims Call Girls : ☎ 8527673949, Low rate Call GirlsAiims Call Girls : ☎ 8527673949, Low rate Call Girls
Aiims Call Girls : ☎ 8527673949, Low rate Call Girls
 
call girls in Noida New Ashok Nagar 🔝 >༒8448380779 🔝 genuine Escort Service 🔝...
call girls in Noida New Ashok Nagar 🔝 >༒8448380779 🔝 genuine Escort Service 🔝...call girls in Noida New Ashok Nagar 🔝 >༒8448380779 🔝 genuine Escort Service 🔝...
call girls in Noida New Ashok Nagar 🔝 >༒8448380779 🔝 genuine Escort Service 🔝...
 
Retail Store Scavanger Hunt - Foundation College Park
Retail Store Scavanger Hunt - Foundation College ParkRetail Store Scavanger Hunt - Foundation College Park
Retail Store Scavanger Hunt - Foundation College Park
 
Kashmiri Gate Call Girls : ☎ 8527673949, Low rate Call Girls
Kashmiri Gate Call Girls : ☎ 8527673949, Low rate Call GirlsKashmiri Gate Call Girls : ☎ 8527673949, Low rate Call Girls
Kashmiri Gate Call Girls : ☎ 8527673949, Low rate Call Girls
 
Abu Dhabi Housewife Call Girls +971509530047 Abu Dhabi Call Girls
Abu Dhabi Housewife Call Girls +971509530047 Abu Dhabi Call GirlsAbu Dhabi Housewife Call Girls +971509530047 Abu Dhabi Call Girls
Abu Dhabi Housewife Call Girls +971509530047 Abu Dhabi Call Girls
 
Escort Service in Abu Dhabi +971509530047 UAE
Escort Service in Abu Dhabi +971509530047 UAEEscort Service in Abu Dhabi +971509530047 UAE
Escort Service in Abu Dhabi +971509530047 UAE
 
Govindpuri Call Girls : ☎ 8527673949, Low rate Call Girls
Govindpuri Call Girls : ☎ 8527673949, Low rate Call GirlsGovindpuri Call Girls : ☎ 8527673949, Low rate Call Girls
Govindpuri Call Girls : ☎ 8527673949, Low rate Call Girls
 
Kristy Soto's Industrial design Portfolio
Kristy Soto's Industrial design PortfolioKristy Soto's Industrial design Portfolio
Kristy Soto's Industrial design Portfolio
 

G'MIG water color filter tutorial

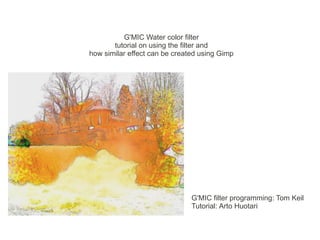
  • 1. G'MIC Water color filter tutorial on using the filter and how similar effect can be created using Gimp G'MIC filter programming: Tom Keil Tutorial: Arto Huotari
  • 2. Section 1: G'MIC Water color filter G'MIC water color filter creates channels of Cyan, Magenta and Yellow and mixes them to each other for different colors. Water color like effect is created by preliminary preparation of the image and textured masks created with Cubism and Fuzzy frame filters. For deeper understanding it is recommended to read through the second section of the tutorial. Whole range of the effect is presented in video “Travel in water color” by Zonder.
  • 3. G'Mic Water color filter, learning the filter Since the filter has a lot of settings it may be that for your image the filter does not produce desired results with the default settings. This tutorial aims to help new user to produce some result and hopefully lead to quicker learning of the filter. Start by setting all sliders to left except Cyan Stroke Strength, Magenta Stroke Strength and Yellow Stroke Strength. Set these sliders to the right. Preview should now look black. Next slide color intensity slider to the right to get colors to the preview window
  • 4. G'Mic Water color filter, learning the filter Next go to the Color brushes settings section and slide the edge distance sliders. Start with the strongest color and proceed to weaker colors next. Move the sliders so that you have three stacked boxes of different size.
  • 5. G'Mic Water color filter, learning the filter Next set the abstraction setting to your liking. Again start with the strongest color
  • 6. G'Mic Water color filter, learning the filter Next increase the brush size to merge the grains of individual colors
  • 7. G'Mic Water color filter, learning the filter To complete the color settings move the stroke strength sliders to left in order to smooth out and weaken the colors.
  • 8. G'Mic Water color filter, learning the filter Set paper color, texture and invert colors settings. Then revert back to the top of the dialogue and adjust Light colors slider at least to 0.01. Note that the effect of the slider may not be linear. Note the difference between 0.05 and 0.06. This is caused by high color intensity and zero dark colors setting. Adjust color intensity settings and click OK to process the image
  • 9. G'Mic Water color filter, learning the filter Final image processed with the previous values
  • 10. Section 2: Creating the effect in Gimp. Base image used in this tutorial is 1164x947 pixels. For larger images effect produces different results and different values for parameters should be used.
  • 11. Step 1: Reduce the detail of the image using selective Gaussian blur Duplicate background layer, select Filters → Blur → Selective Gaussian blur Slice of unmodified image is shown on the right. Blur was done using with radius 10 and delta 30
  • 12. Step 2-1: Enhancing and bringing out the remaining detail. Duplicate the layer. Filters → Edge detect → Edge → Sobel (with value 3 in this case) Edit → Fade Edge→ Dodge (middle slice) Set layer mode to Value (right slice)
  • 13. Step 2-2: Enhancing and bringing out the remaining detail. Duplicate the layer, Set layer mode to burn Filters → Blur → Gaussian blur (value 5) Filters → Edge Detect → Edge → Sobel (3) Edit → Fade Edge → Divide Right click to layer → Add layer mask → Gray scale copy → Invert colors → Add Previous Burn Blur Sobel Masked Divide
  • 14. Step 2-3: Enhancing and bringing out the remaining detail. Duplicate the third layer in the stack. Move it to top, set layer mode to Devide Filters → Blur → Gaussian blur (value 10) Filters → Edge Detect → Edge → Sobel (6) Edit → Fade Edge → Divide Right click to layer → Add layer mask → Gray scale copy → Invert colors → Add From step 2-2 Step 2-3 final
  • 15. Step 2-3: Explained Both blur value and edge detection intensity were increased from previous step. If we look in to the images with out masks a difference can be seen. Image on the left has smaller blur value and edge detection intensity. There are more detail edges present and the edges are thinner.
  • 16. Step 2-3: Explained On step 2-3 layer mode divide was used instead of burn. By zooming in to the image and changing layer modes the difference can be seen. Different layer modes give different results. Idea here is not to use only burn since using burn only creates very dark and strong edges. Our target is to create water color like image we want to enhance the edges with out making them too dark and sharp Before Divide Dodge Burn Value
  • 17. Step 2-4: Continue duplicating the third layer on the stack and use increasing blur and Edge Detect values until the layer bitmap is white after divide. Disregard the white layer. With the example image, blur value 40 loses all detail. There are multiple ways to vary the layer stack. Layer mode of each layer affects the end result, also different result is produced if the visible result (edit copy visible) of previous step is used instead of third layer in the stack for each new enhancement layer (paste as new layer). Now is a good time to save the image and also save it to different name and continue with new copy.
  • 18. Step 3-1: Spread strong colors Blank the background layer. Select one of the visible layers, right click and select “merge visible layers.”
  • 19. Step 3-1: Spread strong colors Duplicate the layer Break the image to LAB channels. Colors → Components → Decompose → LAB Blank A and B layers and select L layer. From tool box select tool “select by color” Zoom in to the image and select as dark pixel you can find and set the selection threshold to your liking. For sample image the L channel was very light so I used threshold of 30. Idea here is to simulate the spread of strong water color because of absorption to paper.
  • 20. Step 3-2: Spread strong colors 1. Blur the selection → Filters → Blur → Gaussian Blur (5) Original 2. Select the border Select 3. Filters → noise → Spread (3/5) → Border (3) 4. Select → feather(3) 5. Filters → Blur → Gaussian (2)
  • 21. Step 3-3: Spread strong colors, recompose the image. Select → None Unblank the A and B layer Colors → Components → Recompose. Note that this will compose the image to the layer it was originally decomposed from. It is recommended to rename the layer now to “From LAB” Original Modified
  • 22. Step 4-1: Move to CMY color space / preparation Duplicate the “From LAB” layer Invert colors of the “From LAB” layer Add new layer with a black color Add new layer with a white color Blank the black and white layer Activate the “Inverted From LAB” layer.
  • 23. Step 4-2: Move to CMY color space ... / create color layers Switch to the channels tab and blank Green and Blue channels Edit → Copy Visible Edit → Paste as new layer Move the layer on top of black layer Rename the layer as Cyan Blank the layer Select “Inverted From LAB” layer
  • 24. Step 4-3: Move to CMY color space / create color layers Repeat previous steps for green and blue channel Switch to channels tab and blank Red and Blue channels Edit → Copy Visible Edit → Paste as new layer Move the layer on top of black layer Rename the layer as Magenta Blank the layer Select “Inverted From LAB” layer Switch to the channels tab and blank Red and Green channels Edit → Copy Visible Edit → Paste as new layer Move the layer on top of black layer Rename the layer as Yellow Blank the layer Switch to channels tab and turn on all channels Switch back to layers tab and add black mask to Cyan, Magenta and Yellow layers Final layer stack is shown on the right
  • 25. Step 4-4: Move to CMY color space / set layer modes Unblank the layers and set layer modes as shown Your image should be completely white now Difference Addition Addition Addition Normal
  • 26. Step 5-1: Create line art Use your favorite method of creating the line art and place it on top of layer stack. Use the original image to create the line art. This was created by Filters → Blur → Selective Gaussian Blur 3 with delta 15 Filters → G'Mic → Artistic → B&W Pencil with default values Colors → Levels to lighten the sketch if necessary Set layer mode to Multiply
  • 27. Step 6-1: Use water color brushes to paint out the colors. Use white color to paint on the black masks of the Cyan, Magenta and Yellow layers. Final image and final layer stack shown. Note that also red, green and blue can be added to color layers as has been done here to bring to make the water look blue instead of brown.
  • 28. End of tutorial Thank you And also thank you for following persons and services for water color brushes that were used to create image on second Section of the tutorial. http://www.brusheezy.com/members/jermshaw http://www.brusheezy.com/members/Aqs http://mcbadshoes.deviantart.com/ http://www.env1ro.deviantart.com